Docker Host Network
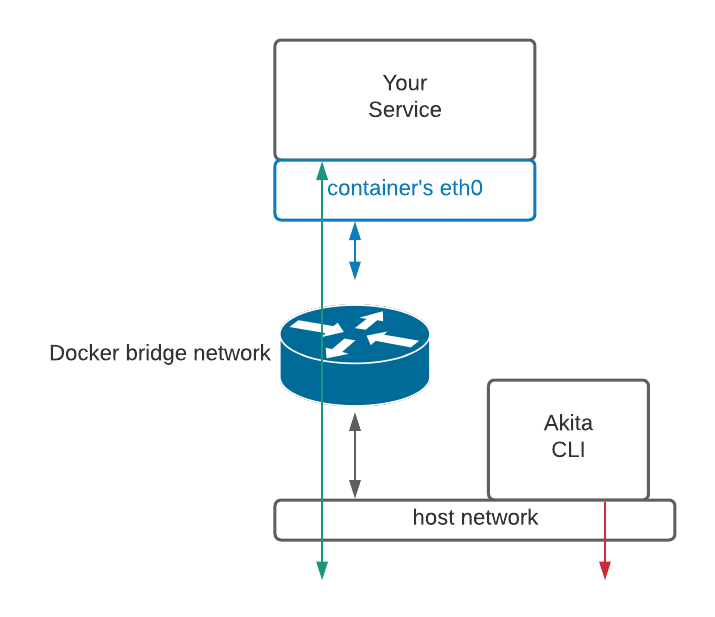
Getting started with Akita is as simple as attaching our Agent to your host network. Below are instructions for installing and attaching the Akita Agent to your host network using docker run or docker-compose.
Recommended for multi-container environments
This approach works best to monitor multiple containers simultaneously, or to monitor a container on an internal network.
You will be setting up the Akita Agent by:
- Creating an Akita Project
- Generating an API key for the Akita Agent
- Installing the Akita Agent
- Starting the Akita Agent
- Verifying that the Akita Agent is working
Akita Account Required
You must have an Akita account to use Akita. You can create an account here.
Create a project
Log-in to the Akita App, and go to the Settings page.
Enter a project name and click "Create Project". We suggest naming the project after your app or deployment stack.

Give your project a name that's easy to remember – you'll need it later, when you start the Akita Agent on the CLI.
Generate API key
On the same Settings page, locate and click the “API Keys” tab. Click the “Set up the Akita client” button. Copy your API key secret into your favorite password manager or somewhere else you can easily access it. Also note your API key, as you will need it later.

Attach the Akita Agent
There are two options for attaching the Agent:
Docker run
To attach the Akita Agent to the host network, run the following command using the port number from inside your service’s container:
docker run --rm --network host \
  -e AKITA_API_KEY_ID=... \
  -e AKITA_API_KEY_SECRET=... \
  akitasoftware/cli:latest apidump \
  --project your-project-name
  --filter "port 80"
Because you are using the port number from inside your service’s container, Akita's packet capture sees the untranslated port instead of the externally-visible port number. This allows Akita to capture any container's external network traffic, and even traffic on internal networks.
Version pinning
The above example will pull the latest version of our Akita Agent. If you would like to pin the version of the Agent, replace ":latest" with the version you choose. See our GitHub for the latest version.
Docker compose
To attach the Akita Agent to the host network, specify network_mode: “host” in the YAML definition as shown below:
version'3'
services:
  ...
  akita:
    container_name: akita
    image: akitasoftware/cli:latest
    environment:
     - AKITA_API_KEY_ID=apk_xxxxxxxx
     - AKITA_API_KEY_SECRET=xxxxxxx
    network_mode: "host"
    entrypoint: /akita apidump --project your-project-name
Version pinning
The above example will pull the latest version of our Akita Agent. If you would like to pin the version of the Agent, replace ":latest" with the version you choose. See our GitHub for the latest version.
Verify
In the Akita web console, check out the incoming data on the Model page. You should see a map of your API being generated as the Akita Agent gathers data.
Then check out the Metrics and Errors page to get real-time information on the health of your app or service.
If everything has been set up successfully, your Akita deployment will look like this:

Updated almost 3 years ago