AWS ECS Host Network
Getting started with Akita is as simple as dropping our Agent into your service. Below are instructions for attaching the Akita Agent to the host network in Amazon Elastic Container Service (ECS). If you have just a few task definitions, you may want to install as a sidecar instead; see AWS ECS (via sidecar).
Are you running ECS on Fargate?
See the AWS Fargate instructions instead.
Are you running Docker Compose within AWS ECS?
See the Docker instructions instead.
You will be attaching the Akita Agent to the host network, and you can run the agent alongside your existing ECS containers. To set up the Akita Agent you will:
- Meet the prerequisites
- Create an Akita Project
- Generate an API key for the Akita Agent
- Write a Docker Compose file for the Akita Agent
- Write an ECS configuration file for the Akita Agent
- Create a new ECS project to launch the Akita Agent
- Verify that the Akita Agent is working
Once you’ve successfully set up the Akita Agent, you can proceed to scale up your deployment.
Prerequisites
- You’ll need to have an Akita account.
- You must have a Linux cluster in ECS for Akita to work.
- You must have access to the host network. The Akita Agent will be installed there.
Create a project
Log into the Akita App, and go to the Settings page.
Enter a project name and click "Create Project". We suggest naming the project after your app or deployment stack.

Give your project a name that's easy to remember – you'll need it later, when you start the Akita agent on the CLI.
Generate API key
On the same Settings page, locate and click the “API Keys” tab. Click the “Set up the Akita client” button. Copy your API key secret into your favorite password manager or somewhere else you can easily access it. Also note your API key, as you will need it later.

Write Docker Compose file
Create a Docker Compose file to define an Akita Agent that captures on a continuous basis. We suggest naming it akita-compose.yaml.
You will need your API key and API key secret from the previous step, as well as the Project name you created.
For production use, add a logging section in the definition to capture logs.
If you want to version pin the Akita Agent, replace akita-cli:latest with a specific version.
version: '3'
services:
  akita:
    image: public.ecr.aws/akitasoftware/akita-cli:latest
    environment:
      - AKITA_API_KEY_ID=apk_XXXXXXXXXX
      - AKITA_API_KEY_SECRET=XXXXXXXXXX
    entrypoint: /akita apidump --project my-project-name
The example configuration uses our public ECR repository to avoid rate-limiting problems pulling from Docker Hub.
Write an ECS Configuration File
You will need to create a new ECS configuration file called akita-params.yaml. It should look like:
version: 1
task_definition:
  ecs_network_mode: host
run_params:
  task_placement:
    constraints:
      - type: distinctInstance
The settings cause the Akita Agent to capture all traffic on the host, and ensure that only one Akita container is run per host.
Create New ECS Project
Once the configuration file is in place, turn the Akita Agent on with the following command:
$ ecs-cli compose -p akita-capture -f akita-compose.yaml --ecs-params akita-params.yaml service up --cluster-config <mycluster>
This creates a new project named akita-capture and configures a service based on the previous two YAML files. The service is initialized with a desired container count of 1.
Verify
You can verify that the container has started with ecs-cli ps, or view its log output if you configured a logging section in the UI.
In the Akita web console, check out the incoming data on the Model page. You should see a map of your API being generated as the Akita Agent gathers data.
Then check out the Metrics and Errors page to get real-time information on the health of your app or service.
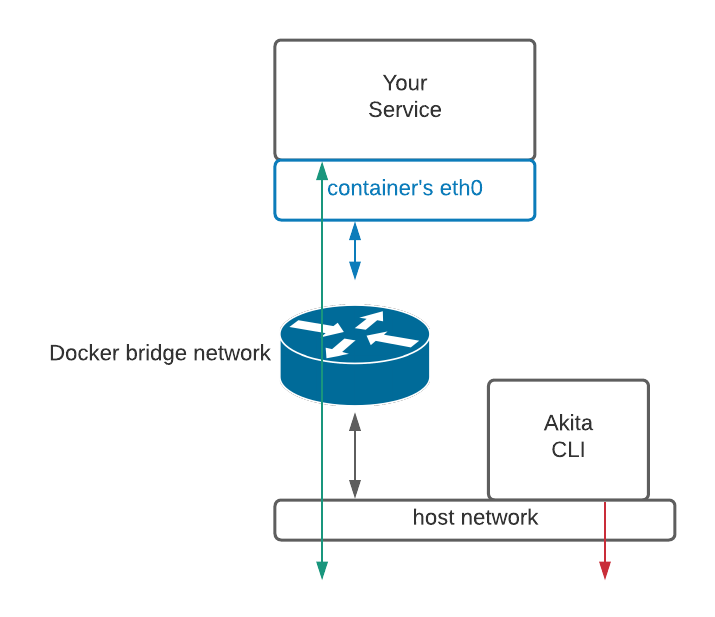
If everything has been set up successfully, your Akita deployment will look like this:

Scaling up
Once you have verified that traffic is successfully being captured, you can scale up to more capture Agents using the following command:
$ ecs-cli compose -p akita-capture service scale NNN
If you capture from many different hosts, you may want to lower the --rate-limit flag to the Akita container's command, to limit the amount of upstream traffic that Akita sends. See apidump for more information.
Updated almost 3 years ago