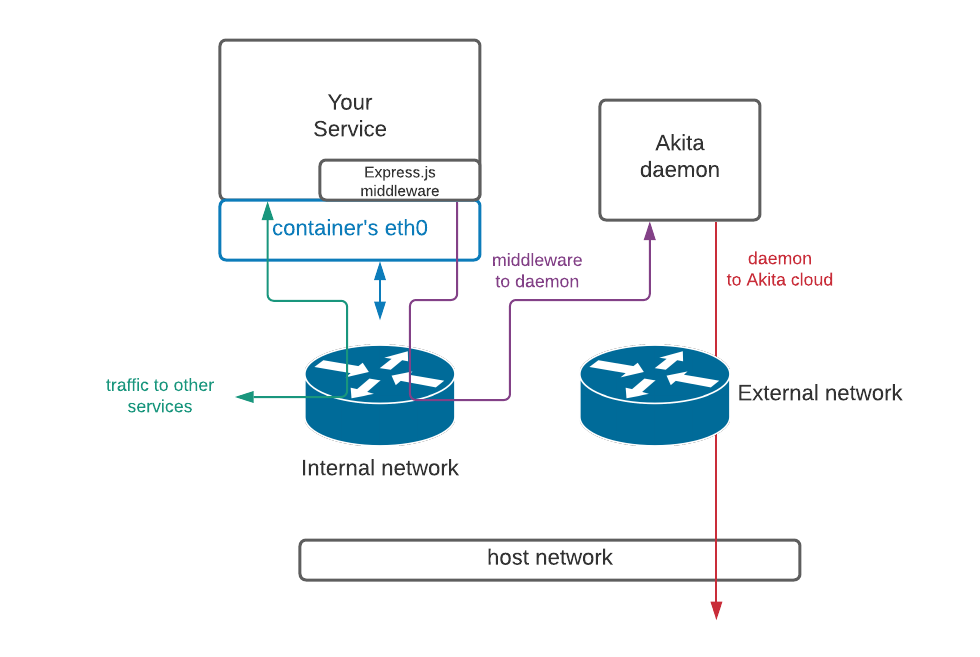
Internal Network
Getting started with Akita in an internal network is as simple as using a Docker Compose file to connect the Akita Agent to the same network as your traffic. Once we’re in, we gather all the data you need and surface it in the Akita app so you can easily see what your system is doing.
Daemon mode
If you run the Akita Agent in daemon mode, the middleware must have access to the Akita daemon, and the Akita daemon must be able to access the Akita cloud services.
Akita Account Required
You must have an Akita account to use Akita. You can create an account here.
Below are instructions for installing and running the Akita Agent on an internal network.
- Create an Akita Project
- Generate an API key for the Akita Agent
- Attach the Akita Agent
- Verifying that the Akita Agent is working
Create a project
Log-in to the Akita App, and go to the Settings page.
Enter a project name and click "Create Project". We suggest naming the project after your app or deployment stack.

Give your project a name that's easy to remember – you'll need it later, when you start the Akita Agent on the CLI.
Generate API key
On the same Settings page, locate and click the “API Keys” tab. Click the “Set up the Akita client” button. Copy your API key secret into your favorite password manager or somewhere else you can easily access it. Also note your API key, as you will need it later.

Attach the Akita Agent
To connect the Akita Agent to an internal or additional external network, create a Docker Compose file like the following:
version: '3'
services:
  test:
    container_name: test
    image: test-middleware:latest
    networks:
      - int-network

  akita_daemon:
    container_name: akita_daemon
    image: akitasoftware/cli:latest
    environment:
      - AKITA_API_KEY_ID=apk_xxxxxxxx
      - AKITA_API_KEY_SECRET=xxxxxxx
    networks:
      - int-network
      - ext-network
    entrypoint: /akita --debug daemon --port 50080 --name my-daemon-name

networks:
  ext-network:
    driver: bridge
  int-network:
    driver: bridge
    internal: true
Version pinning
The above example will pull the latest version of our Akita Agent. If you would like to pin the version of the Agent, replace ":latest" with the version you choose. See our GitHub for the latest version.
In the Express.js middleware configuration, the daemon host would be set to akita_daemon:50080. Docker's DNS setup ensures that the correct IP address is used. The result will resemble the following:

Verify
In the Akita web console, check out the incoming data on the Model page. You should see a map of your API being generated as the Akita Agent gathers data.
Then check out the Metrics and Errors page to get real-time information on the health of your app or service.
Updated almost 3 years ago